Wednesday, September 14, 2022

Creamy Italian Salad Dressing


1/4 cup white wine vinegar
2 tablespoons lemon juice
1/3 cup good quality olive oil
1/2 cup natural, high-quality mayonnaise
2 cloves fresh garlic, finely minced
1/2 teaspoon dried basil
1/2 teaspoon dried oregano
1/2 teaspoon dried parsley
1/2 teaspoon dried thyme
2 teaspoons honey
1/4 cup parmesan cheese, finely grated
salt and pepper to taste
a few tablespoons of water (ONLY IF NEEDED to thin the dressing out a little bit)

Instructions
Add all ingredients to a large mason jar and shake very well until combined. Store in the fridge for a few hours before serving, or serve immediately over your favourite garden salad.
Shake well before serving.
If the dressing is too thick, simply add water one teaspoon at a time to thin it out to the desired consistency.
Notes
This salad dressing keeps in the fridge for up to 5 days, so make it a day or two ahead of serving to save time!
If you prefer to make salad dressing without mayonnaise, simply substitute the mayonnaise in this recipe for 1/4 cup of vegetable oil and shake very well (or blend for best results). From: https://thebusybaker.ca/


Chicken al Pastor on a Sheet Pan

 1 1/2 pounds boneless, skinless chicken thighs 

1/2 yellow onion, thinly sliced

al pastor marinade, below

2 cups finely diced pineapple

for serving, as desired: charred corn tortillas, cilantro lime rice, black beans, Mexican crema or cashew crema, pickled red onions, freshly chopped cilantro, queso fresco or cheese of choice, salsa of choice, lime wedges, etc.

for the al pastor marinade:


3 cloves garlic

2–3 chipotle peppers, from a can packed in adobo sauce

1/2 cup orange juice

1 tablespoon apple cider vinegar

2 tablespoons brown sugar (or honey, or agave)

1 tablespoon achiote paste (see Recipe Notes)

1 tablespoon ancho chili powder

1 teaspoon ground cumin

1 teaspoon dried oregano

1 1/2 teaspoons kosher salt

INSTRUCTIONS

Prep the al pastor marinade & marinate the chicken: Add all listed marinade ingredients to a blender. Blend until combined. Add the chicken thighs & thinly sliced yellow onion to a large bowl. Pour the al pastor marinade over top & toss to combine. Marinate in the refrigerator (covered) for at least 6 hours or up to 3 days.


Preheat the oven to 425 degrees F, arranging the oven racks such that one is in the center of the oven & one is 6-8 inches under the broil. Line a large rimmed baking sheet with foil for easy clean up, as desired, and set aside.


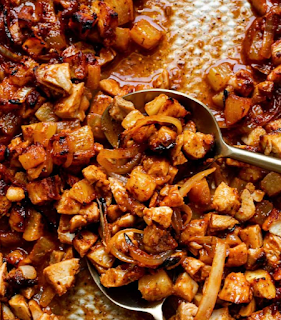
Bake the chicken: Transfer the marinated chicken & onions to the prepared baking sheet, draining & any excess marinade. Add the diced pineapple to the baking sheet. Toss to combine with the chicken & onions, spooning a little extra al pastor marinade into the mix as necessary to coat the pineapple with the sauce. Bake on the center rack for 15 minutes. The chicken should be nearly cooked through. Remove the chicken from the oven to chop, and meanwhile preheat the broiler.  al pastor-marinated chicken thighs & sliced onion on a silver quarter baking sheet with finely diced pineapple. The sheet pan sits atop a white plaster surface.

Dice the chicken al pastor: Transfer the chicken to a cutting board & carefully chop the chicken into bite-sized pieces. Place the chopped chicken pastor back on the baking sheet. Baked al pastor chicken thighs & sliced onion on a silver quarter baking sheet with finely diced pineapple. The sheet pan sits atop a white plaster surface.


Broil for crispy chicken al pastor: Place the baking sheet under the broiler. Broil 4-5 minutes, turning the pan halfway through, until the al pastor chicken are browned & slightly crisp.

Wednesday, August 10, 2022

Whiskey Garlic Cream Sauce


1/4 cup Whiskey

2 Tbsp Butter

2–3 cloves Whole Garlic, peeled

2 tsp Fresh Thyme, minced

1 Tbsp Dijon Mustard

1/2 cup Heavy Whipping Cream (You can use Half and Half also, but it will not be as thick of sauce)

1/4–1/2 cup Beef Broth, to thin if desired

Ground Black Pepper


Place the pan back on the stove and turn the heat to medium low or medium. With the drippings from the steak in the pan, whisk in the butter and allow it to melt into the drippings. Add the garlic and thyme to the pan and allow them to become fragrant, about 1-2 minutes. Stir in the whiskey and continue to whisk, scrapping any bits off the bottom of the pan. Stir in the dijon mustard, cream, and beef broth to thin the sauce if desired. Allow the mixture to simmer and thicken. Season with ground pepper if desired.


From: https://homemadehome.com/cast-iron-bavette-steak-with-whiskey-garlic-cream-sauce/#tasty-recipes-24582

Wednesday, June 15, 2022

Cheese Enchiladas with Red Sauce

14-16 white corn tortillas

16oz shredded Mexican cheese blend

For the Red Enchilada Sauce:

3 Tablespoons vegetable oil

2 Tablespoons All-purpose flour

3 Tablespoons chili powder

1/2 teaspoon onion powder

1/2 teaspoon dried oregano

scant 1/2 teaspoon salt

1/4 teaspoon garlic powder

1/4 teaspoon cumin

1/4 cup tomato paste

2 cups chicken broth


Preheat oven to 350 degrees then spray a 9x13" baking dish, or two smaller casserole dishes, with nonstick spray and set aside.

For the Red Enchilada Sauce: Heat oil in a saucepan over medium heat then add flour and whisk constantly for 1 minute. Add seasonings - chili powder through cumin - then whisk until the spices are toasted and very fragrant, 1-2 minutes. Add tomato paste then whisk until combined, and then slowly stream in chicken broth while whisking to create a smooth sauce. Turn heat up to medium-high then simmer until sauce has thickened, 3-4 minutes, stirring often. Cool slightly - can be made up to several days ahead of time. Warm before using.

Assembly: Spread 1/2 cup enchilada sauce into the bottom of the baking dish then reserve 1 cup shredded cheese and set aside. Place 1 tortilla on a plate or cutting board then add 1/4 cup shredded cheese into the center and roll snugly. Place seam-side down into the baking dish then continue until the dish has been filled.

Spoon enchilada sauce over the tops of the tortillas ensuring they are completely covered - uncovered spots will come out tough and hard - then sprinkle reserved cheese on top.

Cover baking dish with nonstick sprayed foil then bake for 20-30 minutes, or until the cheese has melted and sauce is hot and bubbly. Let enchiladas rest for 5 minutes then serve.


Pickled Onions

 1 medium red onion, very thinly sliced

½ cup water

¼ cup distilled white vinegar

¼ cup apple cider vinegar or additional white vinegar

1 ½ tablespoons maple syrup or honey

1 ½ teaspoons fine sea salt

¼ teaspoon red pepper flakes (optional, for heat)


INSTRUCTIONS

Pack the onions into a 1-pint mason jar or similar heat-safe vessel. Place the jar in the sink, to catch any splashes of hot vinegar later.

In a small saucepan, combine the water, both vinegars, maple syrup, salt, and pepper flakes. Bring the mixture to a gentle simmer over medium heat, then carefully pour the mixture into the jar over the onions.

Use a butter knife or spoon to press the onions down into the vinegar and pop any air bubbles in the jar. Let the pickled onions cool to room temperature (about 20 to 30 minutes), at which point they should be sufficiently pickled for serving.

Cover and refrigerate leftover pickled onions for later. Quick-pickled onions are best consumed within three days, but they keep for 2 to 3 weeks in the refrigerator.

Friday, June 3, 2022

Pretzel Crust

2½ cups pretzels crushed

13 tablespoons butter

¼ cup brown sugar packed


Instructions

Preheat oven to 350 degrees and grease pie dish.

Crush pretzels until fine in a food processor or by hand using a sealed bag and a mallet.

In a medium mixing bowl, melt butter.

Fold pretzels and brown sugar into the melted butter.

Transfer to pie dish. Press using a measuring cup or drinking glass pushing the base of the crust to create a slight wall.

Bake 10 minutes. Cool before filling.

Notes

Substitutions

Pretzels - Make it gluten-free using gluten-free pretzels.

Butter - Unsalted butter is preferred when using salted pretzels, but you can use salted butter if needed.

Brown Sugar - You can substitute white sugar if in a pinch.

No Bake 

Freeze for 30 minutes. Fill per recipe.

Tips

Avoid gaps. Fill in with as needed.

If you have more than 1 of the same pie plate, you can gently press one on top of the other for a picture perfect compact crust without effort!

To Store

Refrigerate - This pretzel pie crust can be stored baked or unbaked in the fridge for up to 5 days.

Freeze - Wrap the cooled crust in foil and place in a freezer bag. It will keep well for up to two months.

Pie Crust

 All Butter Crust

  • 2 1/2 cups all purpose flour,  plus extra for rolling


    1 cup (
    8 ounces) unsalted butter, very cold, cut into 1/2 inch cubes
    1 teaspoon salt
    1 teaspoon sugar
    6 to 8 tablespoons ice water

Combination Butter and Shortening Crust

  • 2 1/2 cups all purpose flour


    1
     teaspoon salt
    2 tablespoons sugar
    3/4 cup (12 tablespoons) unsalted butter, chilled, cut into 1/4 inch cubes
    1/2 cup vegetable shortening
    8 tablespoons ice water

Egg Wash

  • tablespoon heavy cream, half and half, or milk


    large egg yolk
  1. Directions

    Mix the flour, sugar, and salt:

    Put flour, sugar, and salt into the bowl of a food processor and pulse a couple times to mix. Add the butter, half at a time, pulsing several times after each addition:

    Add about half of the butter to the food processor and pulse several times. Then add the rest of the butter and pulse 6 to 8 times until the largest pieces of butter are about the size of large peas.
    Food processor with cubed butter and flour to make a pie crust recipe butter.

  2. Butter and flour combined in a food processor to show how to make pie crust.
  3. Slowly add the ice water:

    Sprinkle the mixture with 4 tablespoons of the ice water (make sure there are no ice cubes in the water!) and pulse again. Then add more ice water, a tablespoon at a time, pulsing once or twice after each addition until the dough just barely begins to hold together. You may not need all the water.

    The mixture is ready when a small handful of the crumbly dough holds together when you pinch it with your fingers.

    Homemade pie crust made in a food processor.

  4. Make two dough discs:

    Carefully empty the crumbly dough mixture from the food processor on to a clean, dry, flat surface. Gather the mixture in a mound.

    Divide the dough mixture into two even-sized mounds. Use your hands and knead each mound just enough to form each one into a disc. Do not over-knead! Kneading develops gluten which will toughen the dough, not something you want in a pastry crust. You should just knead enough so that the dough holds together without cracks.

    If you started with cold butter you should be able to see small chunks of butter speckling the dough. This is a good thing. These small bits of butter will spread out into layers as the crust cooks so you have a flaky crust!

    Sprinkle each disc with a little flour, wrap each one in plastic wrap, and refrigerate for one hour or up to 2 days.

    Two piles of crumbly pie dough.

  5. Remove dough from refrigerator and let sit for a few minutes:

    Remove one crust disc from the refrigerator. Let sit at room temperature for 5-10 minutes in order to soften just enough to make rolling out a bit easier.

  6. Roll out dough, place in pie dish:

    Roll out with a rolling pin on a lightly floured surface to a 12-inch circle; about 1/8 of an inch thick. As you roll out the dough, check if the dough is sticking to the surface below. If necessary, add a few sprinkles of flour under the dough to keep the dough from sticking.

    Carefully place onto a 9-inch pie plate. Gently press the pie dough down so that it lines the bottom and sides of the pie plate.

    Use a pair of kitchen scissors to trim the dough to within 1/2 inch of the edge of the pie dish.

    Rolling out an easy pie crust.
    Using a rolling pin to place an easy pie crust in a glass pie plate.
    The bottom crust set in the pie pan.
  7. Add filling to the pie
    Apple pie filling the pie crust.
  8. Roll out second disc, place on top of filling:

    Roll out second disc of dough, as before. Gently place onto the top of the filling in the pie.

    Trim excess dough with kitchen shears, leaving a 3/4 inch overhang. Fold the edge of the top piece of dough over and under the edge of the bottom piece of dough, pressing together.

    Flute edges using thumb and forefinger or press with a fork.

    Score the top of the pie with four 2-inch long cuts, so that steam from the cooking pie can escape.

    Adding the top crust to show how to make pie crust.
    Top edges folded over for an easy pie crust.
    Crimping the edge of a pie crust.
    Cutting slits in a homemade pie crust.

How to Pre-Bake a Pie Crust

If your recipe calls for a pre-baked crust, as many custard pie recipes do, follow all the steps above for a single, bottom crust only, without filling.

  1. Freeze the crust it for at least a half hour:

    until chilled. This is an important step in pre-baking. Otherwise the crust will slip down the sides.

    Preheat your oven to 350°F.

  2. Line pie crust with aluminum foil:

    When the pie crust is sufficiently chilled, line the pie crust with aluminum foil. Let the foil extend over by a few inches on two sides to make it easier to lift to remove the pie weights when the baking is done.

  3. Fill with pie weights:

    Fill the crust to the top with pie weights - dry beans, rice, or sugar. (Sugar works best.)

  4. Bake:

    Bake at 350°F for 45-50 minutes if making a crust for a pie that will require further cooking, for example a quiche. Bake for 60 to 75 minutes if making a crust for a pie that you don't need to bake further.

  5. Cool completely before filling:

    You may need to tent the edges of the pie with aluminum foil when you bake your pie, to keep the edges from getting too dried out and burnt.

    See more detailed instructions and photos for how to blind bake a crust here.

Combination Butter and Shortening Crust

  1. Make the dough:

    Combine flour, salt, and sugar in a food processor; pulse to mix. Add the butter and pulse 4 times.

    Add shortening in tablespoon sized chunks, and pulse 4 more times. The mixture should resemble coarse cornmeal, with butter bits no bigger than peas.

    Sprinkle 6 tablespoons of ice water over flour mixture. Pulse a couple times. If you pinch some of the crumbly dough and it holds together, it's ready.

    If the dough doesn't hold together, keep adding water, a teaspoon at a time, pulsing once after each addition, until the mixture just begins to clump together.

  2. Form discs:

    Remove dough from machine and place in a mound on a clean surface.

    Divide the dough into 2 balls and flatten each into 4 inch wide disks.

    Do not over-knead the dough!

    Dust the discs lightly with flour, wrap each in plastic, and refrigerate for at least an hour, or up to 2 days before rolling out.

  3. Roll out the dough:

    After the dough has chilled in the refrigerator for an hour, you can take it out to roll. If it is too stiff, you may need to let it sit for 5-10 minutes at room temperature before rolling.

    Sprinkle a little flour on a flat, clean work surface and on top of the disc of dough you intend to roll out. (We use a Tupperware pastry sheet that has the pie circles already marked.)

    Using a rolling pin, apply light pressure while rolling outwards from the center of the dough.

    Every once in a while you may need to gently lift under the dough (a pastry scraper works great for this) to make sure it is not sticking.

    You have a big enough piece of dough when you place the pie tin or pie dish upside down on the dough and the dough extends by at least 2 inches all around.

  4. Place into pie dish:

    When the dough has reached the right size, gently fold it in half. Lift up the dough and place it so that the folded edge is along the center line of the pie dish. Gently unfold. Do not stretch the dough.

  5. If single crust pie: trim edges:

    If you are only making a single crust pie, use a pair of kitchen scissors to trim the dough to within 1/2 inch of the lip of the dish. Tuck the overhang underneath itself along the edge of the pie dish. Use your fingers in a pinching motion, or the tines of a fork to crimp the edge of the pie crust.

  6. If making double crust pie: roll the second crust:

    If you are making a double crust pie, roll out the second disc of dough. Gently place onto the top of the filling in the pie. Use a kitchen scissors to trim the overhang to an inch over. Fold the edge of the top piece of dough over and under the edge of the bottom piece of dough, pressing together. Finish the double crust by pressing against the edges of the pie with your finger tips or with a fork.

  7. Make vents in the top:

    Use a sharp knife to cut vents into the top of the pie crust, so the steam has a place to escape while the pie is cooking.

    Before scoring, you may want to paint the top of your crust with an egg wash (this will make a nice finish).

Egg Wash

A lovely coating for a pie can be achieved with a simple egg wash.

  1. Beat egg yolk with cream and brush on the surface of the pie with a pastry brush.


    From: 
    https://www.simplyrecipes.com/recipes/perfect_pie_crust/